If you find yourself frequently accessing the Windows Control Panel, why
not put it where you can get to it the quickest? Right on the context
menu. Even with the new Settings interface taking over most of its
duties, the old Control Panel is still a tool you’ll need to rely on
pretty often. Sure, you can pin it to your taskbar or even to your File
Manager window but having it right on your context menu means it’s
always just a right-click away.
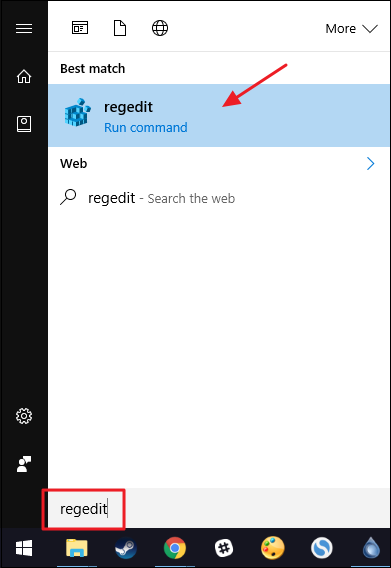
Open the Registry Editor by hitting Start and typing “regedit.” Press Enter to open Registry Editor and give it permission to make changes to your PC.
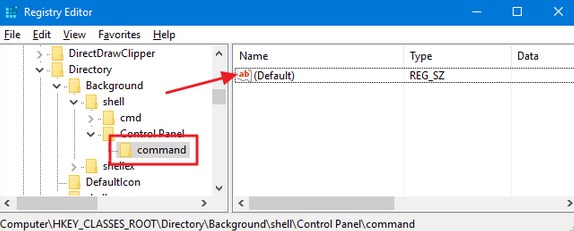
In the Registry Editor, use the left sidebar to navigate to the following key: HKEY_CLASSES_ROOT\Directory\Background\shell
Next, you’ll create a new key inside the shell key. Right-click the shell key and choose New > Key. Name the new key “Control Panel.” The name of this key is the name that will show up on the context menu.
Next, you’ll another new key, this time inside the new Control Panel key. Right-click the Control Panel key and choose New > Key. Name the new key “command.”
With the new command key selected in the left pane, double-click the (Default) value in the right pane to open its properties window.
In the properties window, enter the following text into the “Value data” box: rundll32.exe shell32.dll,Control_RunDLL
The changes should take place immediately. To test it out, just right-click anywhere on your desktop or in File Explorer and see if you see the “Control Panel” command.
If you want to reverse the changes at any time, just head back into the Registry and delete the Control Panel key you created. This will also delete the command key you created inside.
The real beauty of all this is that you can use the same basic procedure to add any program you want to your context menu. Just create a key named whatever you want inside the shell key, create a command key inside that new key, and then change the (Default) value of your new command key to the path for the program.


No comments:
Post a Comment
Please leave you comment to improve our services and support